Taming The Yeast: Easter Egg Bread
Babies are born with 3 fears – heights, loud noises, and falling. It’s not until much later that we add the fear of yeast.
For many people, one of the most intimidating kitchen skills is working with yeast. It’s a mysterious beast. Too cold and it won’t wake up; too hot and it’ll wither and die. Either way and you end up with a flat, brick of a loaf.
Keep a few simple rules in mind and you’ll find you can be confident when working with yeast.
~ Make sure your yeast is current. Each packet is stamped with a date. If it’s post-date, don’t even bother with it.
~ Check the temperature of your liquid with a thermometer. Usually the recipe states the desired temperature, if not, it should be about 120°F.
~ Be sure that you’re using the type of yeast called for in the recipe. Fresh yeast, dry active yeast, and instant yeast each behave differently and can’t be straight substituted for one another.
I’ll walk you through a simple yeast dough recipe and when you’re done you’ll have a beautiful, delicious bread that you can proudly serve for an Easter brunch and say, “It is risen, indeed!”
Recipe: Easter Egg Bread
– adapted from Taste of Home
For the dough:
- 6 to 6-1/2 cups all-purpose flour
- 1/2 cup sugar
- 2 packages (1/4 oz each) active dry yeast
- 1 to 2 tsp ground cardamom
- 1 tsp salt
- 1-1/2 cups milk
- 6 Tbsp butter, cubed
- 3 eggs

For the decoration and glaze:
- 3 to 6 hardboiled eggs, dyed (optional) -Side Note: Megan wrote a great post on coloring eggs with natural dyes.
- Vegetable oil
- 1 egg
- 2 Tbsp cold water
Mixing
1- In a large mixing bowl, combine 2 cups flour, sugar, yeast, cardamom, and salt.
2- In a saucepan over medium heat, warm milk and butter to 120 to 130°F. Check this with an instant read thermometer.
3- Add the warm milk to the dry ingredients; beat just until moistened. Add the 3 raw eggs and beat until smooth.
4- Stir in enough of the remaining flour, 1/2 cup at a time, to form a soft dough that pulls away from the sides of the bowl.
5- Turn the dough onto a floured surface at a good working height. About waist height is ideal for kneading…
Kneading
Once you have formed the dough comes the next mysterious part about working with yeast – kneading. It’s simply working the gluten (the protein in the flour) to make long strands that give your bread structure. There are many ways to knead, but the right way for you is what is comfortable for you.
Start by pushing the heel of your right hand into the dough, down and at an angle away from you. Then curl your fingers around the dough you’ve just pushed and fold it over on itself. The repeat that step with your left hand. Take turns with your hands, pushing and folding, pushing and folding. As you get more comfortable with the process, you establish a rocking rhythm, back and forth, back and forth.
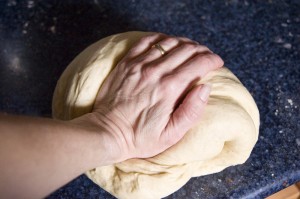 Photo by Lynn Craig
If the dough is sticky, add more flour in small amounts. Work that flour into the dough and then see if it needs more. The amount of flour a dough absorbs varies according to the humidity of the day and of your kitchen.
Watch for descriptor words in your recipe. Is your dough supposed to feel smooth, firm, sticky, elastic, or supple? For this recipe, knead until the dough feels smooth and elastic. My 9th grade home economics teacher told me the dough should feel smooth as a baby’s bottom. I remember this and pat the dough when I’m done kneading.
Rising
6- Place the dough in a greased bowl, turning once to grease the top. Cover with a clean kitchen towel or plastic wrap and let the dough rise until doubled. This should take about 45 minutes. Don’t panic if it doesn’t happen in that time; that usually means that your kitchen is on the cool side. In the winter my kitchen is quite chilly, so I put my dough to rise under a warming light. A very briefly warmed oven also works well.
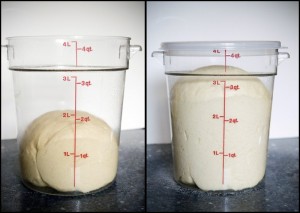 Photo by Lynn Craig
Shaping
7- Lightly rub the dyed eggs with oil. Punch down the dough with your fist (this is my kids’ favorite part to do). The dough will softly deflate. Turn it onto a lightly floured surface. Divide the dough into three equal parts. Shape each portion into a 24-inch rope.
 Photo by Lynn Craig
8- Place the ropes side by side on a greased baking sheet and braid. I find it’s easiest to start in the middle, braid to the end, and then braid up the other end. Bring the braid ends together to form a ring. Pinch the ends together to seal.
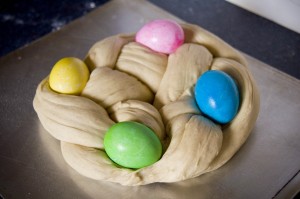 Photo by Lynn Craig
9- Gently separate the braided ropes and tuck the dyed eggs into the openings. Cover and let rise until doubled, about 20 minutes (see notes on rising above). While the ring is rising, preheat the oven to 375°F with a rack in the center of the oven.
 Photo by Lynn Craig
Baking
10- Beat water and egg together and gently brush this over the dough with a pastry brush. Bake for 28 to 31 minutes or until golden brown. Loosen the ring with a spatula and carefully move it to a wire rack to cool.
The leftovers should be refrigerated (unless you don’t put in the dyed eggs).

Now do you feel ready to tackle some yeast?

Gorgeous bread. Great tutorial! Happy Easter!
.-= Maria’s last blog: 2peas3-0 =-.
Thanks, Maria. Happy Easter to you as well!
.-= Lynn’s last blog: Easter Bread =-.
What a great looking bread and wonderful instructions to assist with the making (I must confess I have never made a braided bread before). Happy Easter!
.-= Jan (Family Bites)’s last blog: Five Tips for Entertaining with Kids – Holiday Meals Edition =-.
I hope this post gives you a little more confidence to try it. Happy Easter!
.-= Lynn’s last blog: Easter Bread =-.
I’ve been looking for something like this, thanks so very much! Our Easter table will be beautiful graced with this bread.
I’m excited that you’re going to try it. Let me know how it goes.
.-= Lynn’s last blog: Easter Bread =-.
I love the eggs on top!
We made our Easter Bread last week. So nice to be dirty and baking in the kitchen!
.-= Cheryl Arkison’s last blog: Babka is a Family Affair =-.
Your Babka looks fabulous! What a fun shape. I’ve always wanted to try a bread like that, but never have the right size cans.
.-= Lynn’s last blog: Easter Bread =-.
Lovely recipe ! And beautiful pictures…
.-= Dolce’s last blog: Surdough White Bread =-.
It is risen indeed – LOL! This is such a cheerful-looking bread. I’m still a little confused on the braiding part, though – you just braid it into one long bread and then sort of wrap it into a circle?
Yes, Hilary, it’s like a braided wreath with no center.
I suppose this dough could be kneaded in a stand mixer, right? My carpal tunnel syndrome does not agree with hand kneading, you know…
I think it would work fine to knead in a stand mixer with a dough hook. This isn’t a finicky dough. Just check it every couple of minutes to see if you need to sprinkle more flour on.
.-= Lynn’s last blog: Easter Bread =-.
Can I just say I LOVE the title?! Thanks for this post.
.-= Dagmar Bleasdale’s last blog: See What I Have Been Up To: Introducing The Cry Canceler! =-.
Thanks, Dagmar!
.-= Lynn’s last blog: Easter Bread =-.
Great info on using yeast. I wish I had this info last week when struggling to get my hot cross buns to rise. It took me 5 batches but I got there in the end! Thanks
Snaps to you for persevering through FIVE batches!
.-= Lynn’s last blog: Easter Bread =-.
Thank you so much ladies! I was just saying to my husband this week that I wished I had a basic tutorial on what yeast and gluten do so I’d be less scared when attempting bread/pizza dough making.
Am I correct to understand that you can’t over-knead? Or is that possible?
Technically, I’m sure you can over-knead dough, but in most cases, you get tired long before you’re in danger of over-kneading. Just knead till the dough feels smooth and not sticky; then you know your job is done. Let it rest in a warm spot and you’ll be rewarded with rising dough!
.-= Lynn’s last blog: Easter Bread =-.
Just attempted. All went fine until the baking. Wound up with a soggy gooey mess..
Oh so sad! Don’t give up, bread is worth a few mistakes as you learn!
Over-kneading? Almost impossible if you are doing it by hand. I knead for about 15 minutes, just because I find it so darn relaxing.
I am so excited to try this recipe. My Sicilian grandmother used to make something like this and I loved it!
I hope it’s a close match to your memories. Or if not, a starting point for you.
.-= Lynn’s last blog: Heavenly Blondies =-.
I can’t wait to do this! My bakery that I usually get this bread from isn’t carrying it this year, so I’ve been searching for a recipe…was very excited when this showed up in my inbox!!!
.-= Amanda G.’s last blog: Introduction to Routines =-.
Wonderful recipe and excellent instructions and photos. Sure makes a stunning Easter bread! Happy Easter Lynn!
.-= Elle’s last blog: Second Time’s the Charm =-.
Never baked bread but make me want to bake it with my little one. Thanks!
I made this bread for our Easter celebration this last week-end, a potluck with friends. The bread turned out beautifully! I used naturally-dyed eggs, and they blended in with the tones of the brown bread, so pretty!
Everybody loved it, especially the secret ingredient–cardamom! Don’t leave it out. It makes the bread taste special and fancy, yet nobody quite knows why…hee hee!
Sounds yummy and looks so festive. I want to try it but I am confused about the eggs. So you hard boil them and then bake them with the bread? Do you eat the eggs after?
Thanks, Mae. I wondered about eating the eggs as well.
I just came across this recipie and i was just wondering whether you eat the eggs or not? do you boil them first and then bake them? answer muchly appreciated.
Your easter bread looks amazing! Here s a hint for using coloured eggs on your bread. Bake the bread without the eggs. When it comes out of the oven and while it is still hot, make a hole with something like the handle of your wooden spoon, there where you would like to place your boiled, coloured eggs. Gently twist into the hole your chosen egg. As the bread cools, it tightens around the egg. The colour does nt run onto the bread, and the egg will be nice to eat!