How to build raised garden beds
Urban farming seems to be everywhere. I’m sure I see at least two articles a week this past year on the urban farming trend. There are more and more “concept” cities of the future that are not all glass and steel. Instead, they’re “vertical farms” with each storey having their own plant life. Of course, if we carry on with “business as usual”, then we’ll end up with a city that looks a lot like the bleak glass and dirty metal of Blade Runner, Star Wars, Dune, The Matrix or other futuristic sci-fi films.
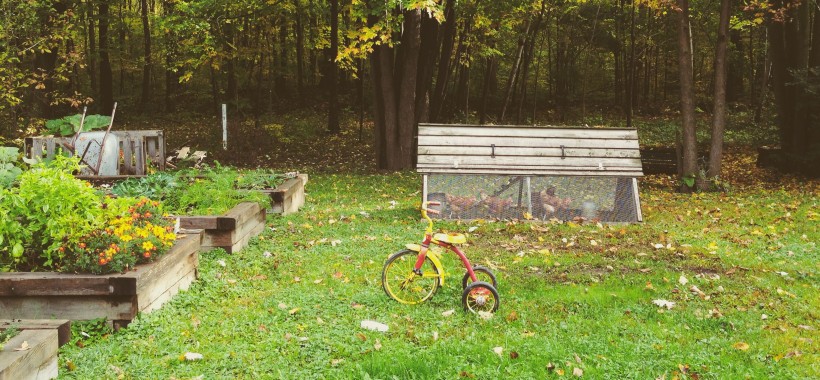
We sometimes jokingly refer to our property as the “Homestead”, as we have tried urban chickens (and will try again this summer with reinforced coop to keep the predators out), and this year we will finally have our garden.
If you eat food, you need a garden – no excuses. Do you live in an apartment? You can get a small flower box of herbs or a few cherry tomatoes. Do you have a small city lot? Carrots and lettuce.
So do you want to be part of this movement? Here is a look into what we’ve done.
Raised Garden Beds:
In addition to some potted plants and a few flower boxes, our raised beds will hold the majority of our herbs and veggies this summer. There are many, many ways to have raised gardens, and I’ll lead you into some of my thought processes (good or bad).
- lumped earth: the simplest of raised beds, you just need to pile a bunch of dirt together, and you’re done. You may notice that some of your dirt washes away in the rain, and will want to hold it back. Below are some options on how to do this.
- rocks: edge your mound of dirt with some rocks. We used some recycled bricks at our last house, and they looked pretty good to me!
- Thin boards: I’ve seen many projects with a 1×6 or 2×8 standing on edge in the soil. If you bury the end a little bit, you get some support and they will not sag as much. I had concerns that this option would bow a bit, and wanted something a bit higher off the ground too (edge can be used as a seat while gardening).
- Crazy like me. Read on.

Size:
I was thinking about Aimee and baby this spring, and didn’t want her to have to stoop too much, so I tried to get them pretty tall, i.e. close to 18″ or so. That meant piling up a LOT of wood. Also, if she was going to be sitting on the edge, I wanted the edge to be relatively flat, i.e. not a board on edge, and sturdy (so thicker than a 1 x 8). The width of the garden was based on how far I though Aimee could reach without being too hard on the back. I figured she could reach 1.5 to 2′, so I made it double as she would be able to access the garden from either side.
The width was also based on minimizing waste when cutting the wood (I wanted to buy a bunch of boards and then cut exactly in 2 or 3 for the ends). The spacing between beds was measured with (not joking) our lawnmower and eyeball. I didn’t want to have to get between the beds with the edger.
Location:
The location on our yard was based on our looking at the sun patterns over the past 2 summers, and seeing that there was a spot on the side that seemed to get more sun than the rest of the yard. It certainly does not get as much sun as it would if it were in a field, as we have tall trees surrounding our lot (and a 25′ cedar hedge on one side that belongs to my neighbor that I’m not allowed to shorten). It remains to be seen what will grow in such a shady spot, but if we are not too successful, maybe we can lobby the local utility (there are power lines that run close to our house) to see if we can arrange a community garden underneath on their land as “fair use” or something like that.
Being a bit of a geek, I was hoping to run into someone who had a more sophisticated version of this app so I could quantifiably justify our garden location. No such luck. We put them close to the compost, so that we would be able to add the nutrients to the soil without too many wheelbarrow trips. Also, as the garden is towards the back of the yard where we plan on keeping the chickens, we’ll have even more fertilizer within close raking distance.
Materials:
I was hoping for a somewhat rugged/country natural look and hoped to be able to find some old railroad ties and then overlap them like a log cabin. After doing some research, it turns out that you do NOT want to use railroad ties, as they have lots and lots of bad chemicals in them that you don’t want to have leaching into your soil or food. Our local DIY big box store did not have the wood I was looking for either. I ended up finding a lumber yard near my house that had 4″ x 6″ rough-cut hemlock, which I was advised would fare excellently in direct contact with the ground. The only stock he had, though, was 12′ lengths, and the only way he would sell to an “individual” was if I purchased an entire bundle, that is 49 pieces. In case that doesn’t mean much to you, here’s what it looked like on our lawn after unloading from the truck.

Construction Method:
I figured I would just place them on the ground and then start stacking, but our ground is sloped, and they were really, really wonky. So I dug a small trench to even things out, which was not an easy task, due to the various-sized rocks in the ground.
As I didn’t want the stacked wood to tumble down on my kids or wife, I knew that I was going to have to attach them firmly together. Also, I wanted to ensure that they wouldn’t budge (yeah right) with frost and stuff, so I determined to fix them to the ground, not just lay on the surface. So I put 30″ stakes through the 4 corners.
I used some scrap metal tubing and cut a point on them, and then drilled a hole into the corners and went to town with a mallet. Noah helped bang with a smaller hammer too. I realized that this would not completely secure the boards together, but figured that the weight of the wood and friction would be sufficient to keep it all together. It was not. I had to use plumbing strapping (on the inside for aesthetics) to keep the ends from popping out.

Result:
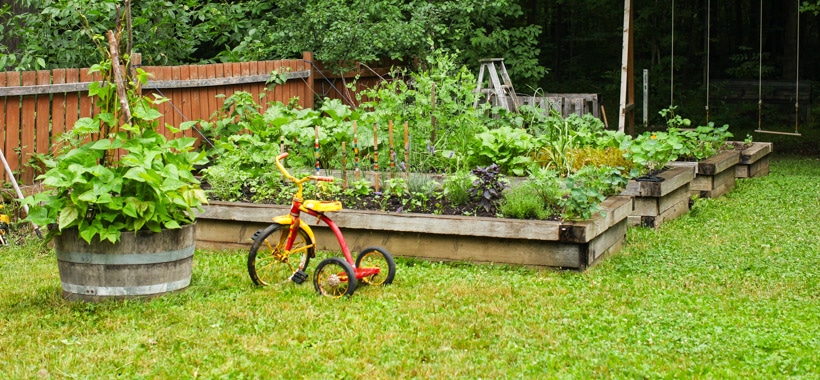
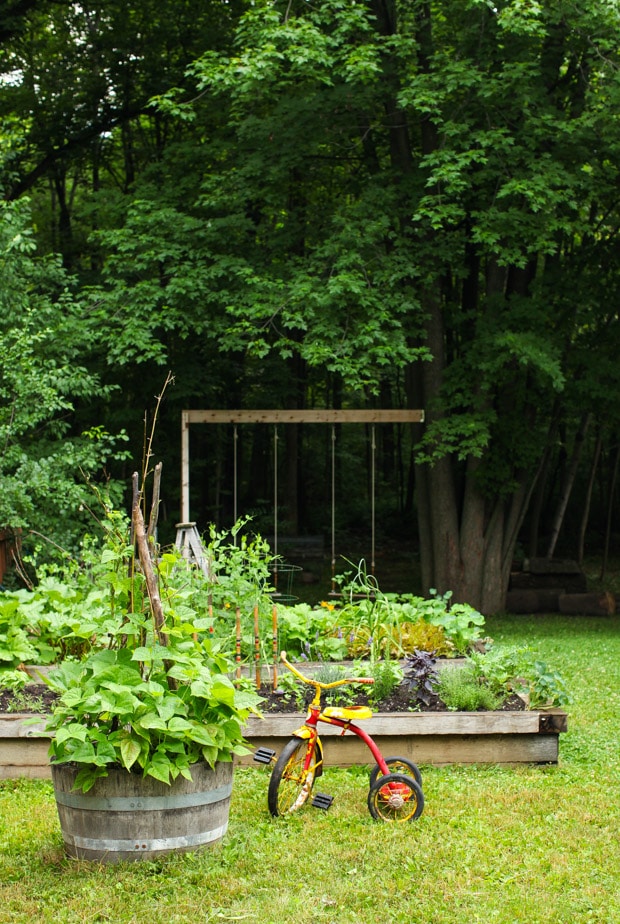
Our raised beds are 4′ wide by 12′ long and are 16″ tall with a 6″ bench all around. We heard that putting some newspaper or cardboard on the ground first would help kill the grass/weeds and prevent them from coming through. We used some of those large flat sheets between the pallets at Costco, and they seemed to work fine so far. Filling the raised beds took more earth than I would have liked due to their depth. Filling them in was easy, as our neighbor helped with his tractor (Mateo at the wheel).
Early this spring, we will be putting a cold frame on top to get an early start on our baby greens.
And that’s it!
Any questions? Let’s hear your tips for gardening – wherever you are!


This so makes me wish I had property… my apartment is feeling so small right now. This is a great tutorial!
I’d recommend reading Mike Lieberman at http://www.urbanorganicgardener.com/. He chronicles his successes and failures at gardening in a small space, and has great tips.
We have space, but don’t want the work of a large garden, plus we have so many deer it would be difficult to keep them away! Last year we made a container garden by getting some cheap 3 gallon buckets at the dollar store. We planted several types of tomatoes, peppers, as well as zucchini and yellow squash (we place these containers on a wire shelf so the vines would have a place to go.) We have a decent sized deck, so the animals stay away, and I can easily water each morning.
I am getting excited about planting again this year!
This is impressive! I have an area where this would be great for! You guys are really on top of this Spring gardening. I better get in gear!
Yes, the post makes us seem hyper-organized in this area of our lives, but the post is about 8 months in the making. Pictures are from last summer and fall. Today’s picture would show the gardens covered in snow. Getting on top of it would be to build the cold frames.
These look great! I can picture them chock full of goodies this summer! I’m curious to know if you’d mind sharing an approximate cost breakdown for us?
The 4″ x 6″ x 12′ hemlock logs averaged out to about $18 each, not considering transport or labor in unloading from the truck and carting to our backyard (those suckers were HEAVY!).
The corner spikes were recycled scrap.
Dirt cost depends on the quality you buy and the quantity. Each of ours was filled with a squeak over 2 cubic yards of earth (27 cubic feet). I think it was 20 or 30 dollars a yard. If you bought in bags at Big Box or a garden store, it would have cost double or triple.
Labor considerations are not included (I worked for free).
I wish we’d had this tutorial last summer when we built ours. We didn’t even think about the wood we used leaching chemicals and are now having to decide if we trust the EPA’s insistence that the chemicals leaching from ACQ treated wood are “safe” or if we need to rip our beds out, replace the trucked in manure from a friends farm and start all over : ( We just assumed since everyone here uses landscaping timbers they would work fine. Bad assumption…Thanks for taking the time to write this up and may others avoid our mistakes!
I know. I really, REALLY wanted to find some “recycled” railroad ties because I was recycling and liked the look. But when I thought about it and did a few Google searches, changed my mind pretty quick.
We had the same problem with raised beds built from chemically treated wood (they came with the house.) My solution is to grow summery wildflowers (I cut them for use in bouquets) instead of veggies in the beds made from chemically treated wood. Then we built a new one with leftover brick for veggies and did more herbs in pots. It’s just not worth it to me to eat veggies grown in treated lumber (ours were really bad – the owners stained and varnished them with nasty deck varnish stuff.)
Wow! I’m jealous of your neighbors’ tractor – we built high beds a few years ago, and I filled them in with a wheelbarrow and buckets. Oh, the things you do as a newbie gardener.
Only 2 were ready when he was available to help with the tractor. The others were done with wheelbarrow and my boy’s dump trucks. It took a long time due to the “inefficiencies” of the dump trucks. =)
We’ve been looking at adding some raised beds to our garden plan and it it crazy the options and things you have to consider. Untreated hardwoods that won’t rot in the weather don’t come cheap either. ; ) Yours turned out soooo nice. I bet Aimee is tickled!
We got secondhand bricks for cheap from craigslist to build ours. I agree, the good wood (cedar, etc) was too expensive to justify it.
Bricks would be nice. And if you consider the lifetime of the original investment, I’m thinking spending the extra on “good” wood up front maybe isn’t such a bad idea.
We had a cute brick-lined garden at our last house, and were VERY happy with it. Photos at http://www.underthehighchair.com/2008/06/monday-garden-update-2.html.
Thanks for the link! I think we’re going to do some brick around our garden patch.
I wish I had lined the bottom of my raised beds with hardware cloth. Last year something ate parts of my carrots and potatoes.
I am sure that we will have some veggie predators to look out for this year too. If you have prevention suggestions, please share!
I’m sending this off to my husband. We are debating doing it ourselves or hiring someone to do it. Thanks for the commentary of the chemicals in the wood, I would have forgotten to ask about it.
As per the post, this version of raised beds is a little crazy – it’s more like landscaping. If you’re going to line your garden with bricks, as we did at our last house, and as other commenters have done, then it is an easy DIY project.
WOW! That looks awesome!! That’s something I’d really like to look into doing. Hopefully our land lords will let us do that. I’ve always wanted to grow our own onions, green onion, lettuce, green peppers, carrots.
Remember, you always have the option of pots and flower boxes. We had friends who practically kept a full garden inside their apartment on shelves and with a special grow lamp.
Looks great! We are fortunate enough to have lots of room and do not have raised beds. Though looking at yours makes me yearn for a bench to sit on while gardening. Kneeling in the dirt can leave a lot to be desired.
Considering the extra cost of 8 – 12 foot solid wood benches is not cheap, they are practical, yes, but that extra height added lots of cost in wood and in dirt.
I have raised gardens: not as fancy as yours, built out of 2 x 12 lumber. I started out with 5 4’x6′ and added 5 more the following year. The thing I love about the garden boxes is the ease of care. I can tell myself, “I’ll just go out and weed one box.” Pretty soon, it’s done! And who can live without fresh garden produce?
Yay for spring! I dug up my first two boxes Monday, and am hoping to plant some greens and lettuce Friday!
Less fancy = more versatile. 2 x 12’s or bricks can be moved or relocated, or arranged into different patterns – which has a definite advantage if you want to expand. Ours are very solid and … permanent. If the sun doesn’t end up being in the right spot, we’ll need to find lots of shade tomatoes.
This is fantastic. Someday, I’ll have a yard to do this. For now, I’ll make do with my Manhattan terrace. Would love to see more posts about urban gardening. Thanks!
Again, look up Mike Lieberman’s chronicles on gardening in a very small space and what to consider if doing so.
Excellent article Danny!
We’ve had a number of raised beds and there are a few suggestions I would like to add:
If you live in a hotter climate, avoid narrow beds, such as 2 feet wide by 8 feet long. The smaller mass of the raised bed will heat up too quickly and overheat the soil (and plants!). Larger beds help to keep soil temperatures normal.
If you live in an area with pesky burrowing creatures you can add a layer of chicken wire to the bed before you add the soil. This blocks any unwanted underground pests.
Hotter climate raised beds also benefit from underground soaker hoses running through the bed compared to traditional surface watering.
Hope these help!
Cheers!
Nick
Thanks Nick. As a rule, I would opt for underground watering system than most above ground systems. We didn’t think about chicken wire for the garden – we’ve been saving it all for the reinforcements on the coop!
Wonderful post on raised garden beds! I dream of building some in our backyard, but I have a bit of a black thumb. Perhaps this year we’ll give it a try. 🙂
As the people at Nike say: Just do it! Start small if you have to with pots or flower boxes if you’re not ready for raised beds.
These look great; this is our first year to try gardening so we’re starting out really small. But I can definitely see my husband getting crazy, I mean, excited enough to build something similar to yours in years to come.
It took us 4 years in our last house to get the square footage of garden that we did in one shot here. Start out small and whet your gardening appetite!
Wonderful post!! Thanks for the tips — off to wish I had similar backyard. It did sounded I’m envious, no? 😀
BTW, congrats to you, Aimee and the boys on beautiful Clara. I cannot stop smiling at her cuteness 🙂
Thanks for the kind words. We can’t stop smiling either.
Danny, thanks for posting this! Leave it to the mechanical engineer to think this project out so thoroughly. 😉
I’ll be saving this tutorial to hand over to my own ME husband in the future when I’m ready for him to build some of these for us. 🙂
Save it for the thinking process, Nicole, not the results. I would have done things a little differently (the next time I build massive raised beds, that is…)
Thanks for the great post and ideas. We had to cut down a dead birch tree recently. I was just looking at the pieces lying on the ground and, after reading this post, think I may use them as sides for some more raised garden beds. Just trying to figure out which spots have the most sun.
Danny, I love this post. A) Because you are an *amazing* husband who thinks of everything for his wife B) Because now I don’t feel so intimidated by the raised beds we’ve been considering.
I think we’ll also try to use Hemlock for the sort-of flower bed we need out front. Really more of a rock bed to hold in rocks on the side of the driveway so they don’t go tumbling down the embankment, but I think hemlock will be perfect for this.
this looks great, might build a smaller version next a wall with some spare wood i have laying around, thanks for the idea & pictures.
Thanks for sharing this blog with us actually, we decorated our garden with some artificial tree house for birds.
Really a very helpful article thanks for sharing and keep on sharing!