Yogurt Unplugged (almost)

by Lynn on June 23, 2010

in Cooking School

homemade yogurt

Written by Lynn of Cookie Baker Lynn.

Iam a sucker for kitchen catalogs, those gorgeous, glossy advertisements that come in the mail. They do a wonderful job of tempting me, but when I’m done drooling, usually I just pitch the catalog without placing an order and without longing regret.

How am I able to turn my back so resolutely on those fabulous tools, gadgets, and machines that promise to pluck the last olive from the jar, take out strawberry hulls with ease, and make baby food at the press of a button?

I’ve learned a valuable secret. When you buy a single purpose gadget, you not only have to pay for it, you also have to store it. Most of us don’t have kitchens as big as a barn in which to store gadgets. It’s much tidier (and cheaper) to only invest in good quality tools that serve a multitude of purposes. A set of sharp knives will take the place of hundreds of kitchen gizmos and a solid set of pans will be in use years after you’ve put that hinged omelet pan in the garage sale.

One small appliance that falls in that category for me is a yogurt maker. If you have one and you love it, super, you need read no further. But if you have always wanted to try making yogurt, but didn’t want to buy a machine, read on.

Yogurt is simple to make. All you need is milk, a small amount of yogurt with live, active cultures, dry milk powder, a saucepan, a thermometer, a quart canning jar with screw on lid, a heating pad, a towel, and a large soup pot. Most likely you already have all of that on hand. And if you have to buy a heating pad, hey, that also works really well as a heating pad!
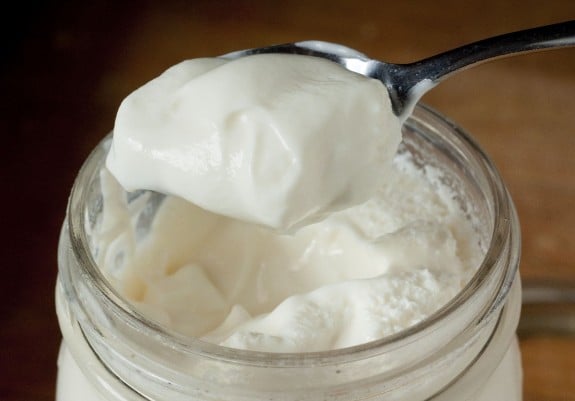
Photo by Lynn

Plain Yogurt

  • 1 quart milk (non-fat, 2% or whole – your choice)
  • 1/2 cup dry milk powder
  • 2 Tbsp plain yogurt with active cultures, at room temperature

1- In a medium saucepan stir together the milk and milk powder. Heat to 180 deg. F, stirring occasionally. Take the pan off the heat and let the mixture cool to 115 deg. F.

2- Place the yogurt in a small mixing bowl. Pour a small amount of the cooled milk into the yogurt and whisk to blend.

3- Pour the yogurt mixture into the milk and whisk to blend thoroughly.

4- Pour the mixture into a clean, glass quart jar. Screw on the lid. Place the jar on a heating pad set to “low.” Wrap a towel around the jar and cover it with a large, inverted soup pot.

5- Incubate for at least 8 hours. I like to do this at bedtime and wake up to freshly made yogurt!
[print_link]

Troubleshooting

If your yogurt doesn’t firm up, most likely you either used a starter yogurt that wasn’t active, or you killed the cultures by mixing the milk into the yogurt before the milk was sufficiently cooled down. Don’t throw away that quart in disgust. Put it into smoothies or bake with it and try again!

Now that you know how to make basic yogurt, come to my blog, Cookie Baker Lynn, to see how to make yogurt cheese, and get a recipe, too!

What’s your favorite way to use yogurt?

Pin It

Get the weekend newsletter

If you liked this post, why not get the free newsletter? Enjoy weekly highlights of the best stuff on all the Simple Living Media blogs. Plus, you'll meet Jenny.

{ 46 comments… read them below or add one }

Shannon

Hi Lynn. I enjoy making and eating fresh yogurt, especially with jam. I’ve got a question though. I have acidiphilous (sp?) which are live cultures in the fridge in capsule form. Do you know if I can use these as a starter? Thanks. Shannon

Reply

Lynn

I checked the label on a yogurt from the store and it has L Acidophilus, L. Bulgaricus, S Thermophilus, and Bifidus. You could try it with the acidophilus capsules, but I think you need a broader range to get a good yogurt.
.-= Lynn’s last blog: Fun With Yogurt =-.

Reply

Shannon

Thank you Lynn. That makes sense. Just goes to show that most things usually aren’t as good as the “original”.

Reply

Leann

My friend and I make our own yogurt, it is so easy! We don’t even use a heating pad. I use all the same size jar and then put then in a cooler w/ 50 C water. Works like a charm! I found the recipe and others at http://biology.clc.uc.edu/fankhauser/cheese/cheese.html
He is a Professor of Biology and Chemistry who milks goats. His site is not pretty, but the recipes work! Thanks for sharing this about yogurt, I have told a lot of people about making it, but them seem skeptical. A shame b/c it really is so easy! I am taking my thermometer on vacation so I can teach my mom!
Oh, my fav way to eat is is with a frozen overripe banana. The best. I could eat it all day long! Yum Yum!
.-= Leann’s last blog: Cracker Recipe =-.

Reply

Lynn

What a great idea! Thanks for sharing the alternative to a heating pad.
.-= Lynn’s last blog: Fun With Yogurt =-.

Reply

mary

A cooler!? That’s genius! That’s way better than my stock pot waterbath I’ve been using. You can fit way more jars of yogurt in the cooler than the pot. It’d be so great to make like 2 gallons of yogurt in one day. Thanks for passing that along.

Reply

Jan (Family Bites)

I made homemade yogurt once and didn’t even think about using a heating pad – what a fantastic idea. I tried to keep mine warm by placing it on my fridge (near the back) but I just think the heating pad would work so much better. Thanks for the great tip.

Reply

Lynn

I hope this works out better for you, Jan.
.-= Lynn’s last blog: Fun With Yogurt =-.

Reply

Kara

I’ve been meaning to try this! Now I have no excuse, your method is slightly easier than the one I found previously. The pictures sure make me want to eat some yogurt. :)

Reply

Lynn

Now that you want it and know how to do it, there’s nothing holding you back. Go for it and let us know how it turns out.
.-= Lynn’s last blog: Fun With Yogurt =-.

Reply

Kara

I’m planning to try it out this weekend (despite the fact that I have a 1/2 tub of plain yogurt still in the fridge…). I just need to pick up some milk.

Reply

Kara

Okay, so I didn’t make yogurt this weekend…I made it last night! Here’s the deal, I felt guilty about making more yogurt when I still had some to eat up in the fridge (and then I accidentally ate my starter). So, I went to the store for a starter and couldn’t find any plain yogurt expect that Yoplait Greek stuff (which I was so certain would not work at all).

Anyway, it was a success. :) I even kept track of the time a bit for the people who wanted to know how long it took. The first part where you heat up the milk to 180 took about 15-20 minutes (over medium heat) and the cool off took 30-ish minutes (which was the majority of the time spent). The whole ordeal took around 50 minutes to an hour and was pretty easy.

As for the taste: pretty good (despite the fact that I needs to cool for a while in the fridge). THANKS, Lynn! :D

Reply

Kara

*it needs

Lynn

Yeah! Thanks so much for keeping rack of the time. That’s so helpful! I’ll make a note of it on my recipe. Good job!

canuck_grad

I’ve never tried homemade yogurt before…. I don’t eat that much of it, and it just always seemed like more of a hassle than it was worth. I mean, I know it’s not that big of a deal, but I don’t have a thermometer to use, and I’d have to dig out that heating pad lol… anyway, my little guy eats a lot of yogurt now, and I just came across these instructions, which are even easier, so I thought I might try them:
http://ourpeepshow.wordpress.com/2009/10/18/homemade-yogurt/

Reply

Lynn

Thanks for sharing that. I’ll have to check it out.
.-= Lynn’s last blog: Fun With Yogurt =-.

Reply

Claire

This sounds like a great way to make yogurt! I have started using yogurt a lot more and having a way to make it would really help my budget. I can’t wait to try this. Thank you!

Reply

Cindy

I see more recipes for plain yogurt without milk powder than with. I wonder if it helps thicken or if it helps the flavor or something else? Have you tried it with and without and noticed any differences?

Reply

Lynn

I haven’t tried it without the powder. I assume it’s there to give a thicker consistency to the yogurt. I don’t love the flavor of powdered milk, so I know it’s not for that reason!

Reply

Kara

I read on a website awhile back, that the powdered milk helps thicken the yogurt so that it’s more like the consistency of the store-bought yogurt we eat in North America. (Of course, if you’re not from North America, then this may be a terrible explanation).

Reply

Cindy

Thanks a bunch. The yogurt in the picture looks so beautious.

Reply

Susan Smith

I make lots of homemade yogurt with a similar method, but quite often mine separates after going in the fridge. Do you know what causes this? incorrect temps? too little milk powder? poor culture? I’m too impatient to try to tweak each of the variables one by one!

Reply

Lynn

If you get a clearish liquid on top, that’s just whey. You can pour it off or save it for bread baking. If the yogurt underneath is fine, don’t worry about it.
.-= Lynn’s last blog: Fun With Yogurt =-.

Reply

Mother of Pearl

I’ve found that yogurt is fussy about not being moved while it is incubating. If it gets bumped around some of the whey separates. See if that makes a difference. If all the whey separates that means the temps are off – at least that was my experience.

Reply

Jennifer Jo

Hey there, Lynn! Very creative, making yogurt with a heating pad. I never EVER thought of that.

I’ve been making yogurt for years (going months and months on the same starter) and I don’t use any milk powder in my recipe. It’s a simple as can be. http://bit.ly/bFdc9S

One other thing to note: if you’re attempting to make yogurt like Stonyfield (my favorite), sub in a bunch of cream. Ooo-la-la! http://bit.ly/cHWU2k
.-= Jennifer Jo’s last blog: A number of things =-.

Reply

Lynn

Thanks for the tips, Jennifer! Cream? Sounds wonderfully decadent!
.-= Lynn’s last blog: Fun With Yogurt =-.

Reply

Aimee

Thumbs up for cream!

Reply

Kara

Ah! If I can successfully make Lynn’s yogurt, maybe I’ll give this a try because I’m sort of obsessed with Stonyfield yogurt. Thanks for the link!

Reply

Jen C.

Awesome idea using a heating pad, I’ve never thought of that. I used to make yogurt all the time when we had a digital oven and I could set it to a very low temp to heat up the oven and then turn it off and on to keep it at the same temp. Now that we’ve moved we have an older oven with knobs that I can’t set to 110 degrees and have gone back to buying yogurt (which isn’t nearly as tasty). I’ll have to try this method.
.-= Jen C.’s last blog: Photo Challenge Day 1 =-.

Reply

Lynn

So glad you can get back to making your own yogurt!
.-= Lynn’s last blog: Fun With Yogurt =-.

Reply

Krista

Thank you so much for posting this. :-) I’ve been wanting to make homemade yogurt and thought I needed the right equipment. You’ve inspired me! :-)
.-= Krista’s last blog: Getting Better Beautifully with Help from Germany =-.

Reply

Lynn

I’m so glad that this was helpful for you. I hope you have great success with your yogurt making!
.-= Lynn’s last blog: Fun With Yogurt =-.

Reply

Wendy

Awesome! I think this just might give me the push I need to give it a try!
.-= Wendy’s last blog: a really long post with no photos (and a free download!) =-.

Reply

Meg

Can you estimate about how long it takes the milk to drop from 180 to 1115 degrees? I’m trying to figure out how long before bedtime to start making it!
Thanks!

Reply

Lynn

Oh, Meg, you’ve caught my worst failing at making yogurt. I’m lousy at estimating the time. I get bored watching the thermometer, go do something else, and it’s wayyyy over 180. I set it aside to cool, forget about it, and come back to 90 degree yogurt. So, if you could make it and time it for me, that would be immensely helpful!
.-= Lynn’s last blog: Fun With Yogurt =-.

Reply

Jennifer Jo

I think it generally takes about an hour? Maybe? I do other tasks, once in awhile pausing to stick my finger in the milk (I don’t use a thermometer).

One other tip: If you boil your milk for a little while, cook it down a bit (5 minutes, perhaps, or longer), you’ll get a thicker yogurt…
.-= Jennifer Jo’s last blog: A number of things =-.

Reply

Nikki Moore

I used to make yogurt in the oven almost every week (although I never used milk powder), but since it’s been hot outside, it has not been appealing to have the oven on that long. Plus I know it is not an efficient use of energy. This sounds like it will solve both of my problems.

Also…a few times my yogurt didn’t turn out, and I bet it was because of too-hot milk. Never even thought of that. Thanks for this new approach and the great tips!
.-= Nikki Moore’s last blog: I Hate Exercise =-.

Reply

Rosemary

I don’t have a heating pad (actually don’t know if I’ve ever seen an electric one). I have used my Thermos and it worked well. Is a heating pad like a small electric blanket?
.-= Rosemary’s last blog: Italian Heaven =-.

Reply

Kara

It is a bit like an electric blanket (at least I think so, since I’ve never seen an electric blanket), only it’s around 12″x15″ in size.

Reply

Linda

Look for heating pads at a pharmacy or Walmart. They should be in the area with other things meant for muscle pain relief.

Reply

Heather Moll

Thank you SO much for posting this. I made yogurt tonight and it totally worked! I am thrilled. I had tried making yogurt in my crockpot before but had no luck (although my mom makes hers in their all the time). I was a bit hesitant to try again but am soooo glad I did. THANK YOU!

Reply

gloria of Veghead etc.

Your post inspired me to try making yogurt *completely* unplugged. I have a small styrofoam “ice” chest with a tight-fitting styrofoam lid. I boiled water (in my electric kettle) and poured the hot water into two small glass jars with tight-fitting lids. For Step 5, I took the wrapped quart jar of the yogurt mixture and put it in the styrofoam chest. I then snugged the two small glass jars with hot water up against the quart jar and closed the chest’s lid. It worked great! I incubated the yogurt this way for about 22 hours (a friend suggested that) and changed the hot water once, but next time I will try incubating 8 hours without changing the hot water. Thanks for the inspiration!
gloria of Veghead etc.’s last post: The gift that keeps on giving

Reply

Jen

I’ve been making yogurt too… Can do in a crockpot (heat til 185 degrees)–about 3 hrs, cool to 110 and add the starter yogurt.
Put the lid on crockpot and wrap in a towel. Put the insert in the oven with the oven light on– the stoneware+light keeps it warm. I leave it in there overnight. It’s perfect in the morning!

Reply

Linda

I’m curious about how you flavor yogurt. I want to make vanilla yogurt, but vanilla extract has alcohol in it and that kills the cultures. I found no alcohol vanilla, but I have no idea how much to use.

Reply

Melissa

Hello, I love your blog. I am going to try the yogurt. But I have a question. How long does this last in the fridge before going bad? Not sure if it will last that long, just wondering? Thanks

Reply

Suzanne

Now if I want to make Greek yogurt, I use goat’s milk? and Greek yogurt cultures? I have never been able to buy enough yogurt to satiate my three grown boys. One time I bought some on sale….12 500ml containers! Two days later I went back for 12 more!
I would also like to know if you can put the jars in a crock pot on low overnight. It would be so easy now wouldn’t it?

Reply

Add to the Conversation:

CommentLuv badge

{ 5 trackbacks }

Previous post:

Next post: