Cooking with Kids: Pita Bread
Baking can be intimidating even for adults, but I believe that fears and doubts should be checked at the door and the kitchen entered with abandon – and ideally with a child or two in tow.
Children are baking with their parents less and less often; with our busy lives, plus the easy accessibility of baked goods at supermarkets, youngsters are missing out on opportunities to learn. I say let yeast and fly, (let’s face it, things may get may be messy), just get in the kitchen together and have some fun.
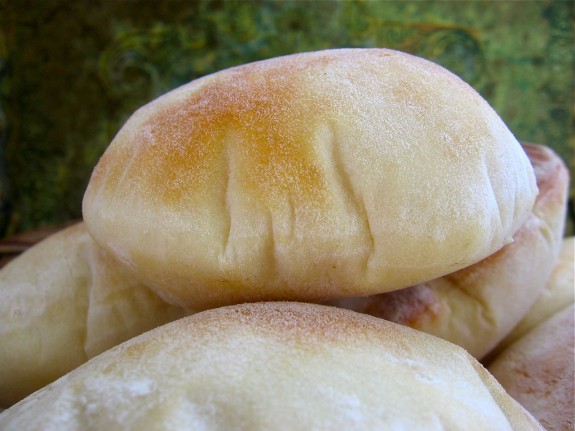
Pita bread is something my family has been making for as long as I can remember, and is one recipe I continue to make with my children. Our family’s simple recipe is ideal for making with children because it comes together quickly, requires only one brief (30 minute) resting time, and produces almost instant puffing results in the oven. I promise you will be as excited as your children to see these flat rounds of dough balloon to three times their size.
With this recipe, kids can enjoy the fruits of their labors within an hour – perfect for lunch! You’ll find pitas are so fun to make and puff up nicely, leaving a hollow center to fill with grilled chicken, veggies or whatever you desire. They are also pretty amazing just warm from the oven with a drizzle of olive oil.

Kids Can:
- assemble ingredients
- measure ingredients
- divide dough
- shape pita
- watch the magical baking process
Recipe: My Family’s Pita Bread
- 1 tablespoon yeast
- 1 ¼ cup warm water
- 1 teaspoon salt
- 3- 3 ½ cups flour
- Dissolve yeast in water for about 5 minutes in the bowl of an electric mixer.
- Add salt and 1 ½ cups flour and with the dough hook, beat to make a batter. Add additional flour until a rough, shaggy mass is formed. Knead 8 minutes until dough is smooth and elastic. Add more flour if it is too sticky.
- Turn dough onto a lightly floured surface and divide into six pieces for large pitas or ten for smaller. I make all sorts of sizes to suit different snacks and meals.

- Form dough into balls, then flatten with a rolling pin into ¼ inch thick discs. Try and keep an even thickness as this is what helps them ‘puff’.
- Let rest on the floured surface 30-40 minutes until slightly puffed. Preheat oven to 425F.
- With a large spatula, flip the rounds of dough upside down on to a baking sheet. Bake 12-14 minutes until light golden. Stick around to watch for the first five minutes of baking when the pitas perform their magic and puff up from flat pancakes to proud, four inch high pitas!


These store for up to two days well wrapped or frozen for three weeks.
Fresh pita. Are you game? Call the kids and mix some up today.


Thanks for sharing this, Aimee – it is amazing 🙂 I can’t believe I have never made pita with my kids or students… You are right – it is ideal, even for the impatient baker! That’s why I usually don’t do breads. They usually take too much time! I’ll bookmark it and come back when it’s not too hot to use the oven!
May I ask what kind of yeast is used in this recipe? I would like to make these tonight for dinner.im talking about the puffy pitas
This sounds yummy! I’ve made bread machine pita bread, but waiting for the dough to mix takes ages. I’m definitely going to give this a try (I’m slowly discovering that bread-making isn’t so scary.
These look incredibly easy and fun. I have my grandson with me for the next few weeks, and I know he’d love how they poof in the oven. We’ll be trying these for lunch very soon! Thanks for sharing your recipe.
I haven’t made pitas for a long, long time. Thanks for the reminder of how easy and yummy these can be.
Thanks for posting this. I will give this a try soon. My 8 yr. old ad 18 yr. both like to cook.
Do you think I could sub 1/2 the flour with whole wheat and still have good results?
Ooh, this is fun! Thanks for sharing the recipe. I make pita all the time using my Artisan Bread in 5 Minutes a Day stored dough, but for when I don’t have any on hand, it’s nice to have a short cut. I’m also curious how these stack up against the ones I’ve been making — I may have to do a bake-off. 🙂
If anyone uses the Artisan Bread in 5 Mins method and wants to see how that translates into pitas, I wrote about it here.
Oh yum! These looks just as easy as pizza dough. And no worries, I don’t have kids, but I’ll totally get some flour on the floor… 🙂
Is it possible to freeze the dough? Sometimes, I’m unable to cut my pizza dough recipes in half, so I freeze a portion and let it thaw and rise again before use (and it tastes just as good).
We love pita! Thanks for posting this recipe…it looks easy and fun to make!
Hanan
FYI, I made it with 100% whole wheat flour and they puffed up about half as much as the picture here and were ROCK HARD. I will try again with 1/2 white, 1/2 whole wheat. I also left too much of the kneading up to my 3 yr old. I’ve found really working it is the key to success with whole wheat.
You are right about the working part, Joie. Resting is also very key. Try letting the dough sit for 10 minutes before kneading it.
Hi Joie/Aimee,
Did you try making the pita bread 50/50 white and whole wheat? I’m interested to know how they turned out if you did.
Can’t wait to try this!
Thanks for sharing! My toddler helps me make whole wheat loafs all the time, but it takes so long I know she doesn’t completely understand the bread we eat is the same as the dough we mixed and kneaded together.
I look forward to making this (incredibly simple!) recipe with her and being able to better share with her the fruits of her labor 🙂
Those are gorgeous pitas!
What would people recommend if I don’t have an electric mixer with a bread hook? I am sure this recipe has to be possible without one! 🙂 Thanks! My son and I love cooking and baking together so this would be wonderful!
This dough is even more fun to make by hand, Rachel! Just knead it for a little longer (like 10 minutes total).
Alright! We will just have to try that! Thanks!
I made these this morning and they were so easy to make, fun to bake, and delicious to eat! I will definitely put these in my regular bread-making rotation! Thanks!
My first and only pita-making attempt was done another a time crunch and was too stressful to enjoy. Your recipe looks blessedly simpler. Add in the prospect of spending un-rushed time with my children, and I am willing to try again.
.-= Julia’s last blog: Fast and Easy Star Pinata =-.
We love homemade pita at our house – we could never go back to the cardboard grocery store version of pita bread. The quickness of this recipe is appealing! I normally make the dough in my bread machine, which takes nearly 2 hours. I have had success using all whole wheat flour – my pita is tender and perfect! If you haven’t made homemade pita try it soon! You won’t be disappointed!
my daughter Gracie and I made these too day!
I am so Glad you shared this! we used to have a recipe that i used all the time and then just kind of stoped making pitas… well this recipie is AWESOME! and we will for sure keep on makeing them 🙂
thanks again for sharing!
oh and I used all wheat flour and they were delish!
That’s great! Thanks for stopping by to share your success.
Yay! My 22 month old and I made these today. They didn’t puff up as much as yours but they tasted phenomenal! We don’t have a glass window on our oven, so one of the best things about this recipe for us is that the final product looks comparable to what we put in the oven, coupled with the short bake time, so she was able to recognize that she made it 🙂 Can’t wait until we get a new oven (we really close to needing it) and I’ll choose one where she can watch the puffing process!
I just made them with my daughter, but they barely puffed up. What went wrong? I’d love to try again once I know what to change!
Hmm, perhaps they rested too long, or were not rolled evenly enough. I’ve found that if one side is considerably fatter than the other, they don’t puff as well.
Try, try again!
Thanks for this great pita bread recipe. While I do not have kids, I still am slightly intimidated by recipies that involve yeast so a kids recipe is right up my alley. I am happy to report that the results are wonderful!! Thank you again!
so what did i do wrong if only half the pita rose ? mine did not look like puffy pillow like the picture :[ help ?
If they are not rolled really evenly, and one side is thicker than the other, they they often do not puff properly. Sorry! I bet they still taste great, though!
omg that looks soooooooooooooo good hope to reply soon okay bye now
After you have finished baking the pitas can you eat them immediately or you just have to leave them for a day to eat them?
Just tried this recipe. And sadly my pita did not rise. Not sure what went wrong but I’d love to do it again
I made a batch and they turned out great! Then I put the ones we didn’t eat in a sealed Ziplock on the counter. The next morning they were really hard. Can you elaborate on how to “properly wrap” for storage?
Thanks! I love this site 🙂
Hmm, a sealed bag usually works for me. You can sprinkle them with a bit of water, wrap them in a towel and microwave for a few seconds, they will soften.
Awesome recipe, the family went crazy. And sooo good for shawarma!
Amazing!! My first time ever making pita bread and I’m sure I’ll use this every time I do!! Truly a delish recipe.
Did you use fresh yeast or dried active yeast for these? Thanks 🙂
What kind of yeast did you use? The pitas in your picture look amazing! Unfortunately, mine barely puffed up.
I know this post is older, so I hope this helps someone. If your pitas don’t raise enough or raise unevenly you can make pizzas! you can use them for open faced sandwiches, grilled cheese (made in a waffle iron, even), or anything that you would use flat bread for.
I was looking for a pita recipe that did not flatten after baking. I noticed that your recipe allows the pita to rise after they are rolled out. Is this how to create the puffy pitta that I enjoyed at a restaurant?